Git Pull Download In R
This browser is no longer supported.
Upgrade to Microsoft Edge to take advantage of the latest features, security updates, and technical support.
- Feedback
- Edit
Quickstart: Code with Git
- Article
- 11 minutes to read
Thank you.
Azure DevOps Services | Azure DevOps Server 2020 | Azure DevOps Server 2019 | TFS 2018 - TFS 2013
In this quickstart, learn how to share your code with others. After you create a new organization and project in Azure DevOps, you can begin coding with Git.
To work with a Git repo, you clone it to your computer. Cloning a repo creates a complete local copy of the repo for you to work with. Cloning also downloads all commits and branches in the repo, and sets up a named relationship with the repo on the server. Use this relationship to interact with the existing repo, pushing and pulling changes to share code with your team.
Install one of the following Git command-line tools:
- To install Git for Windows, including Git Credential Manager, see Install the Git Credential Manager.
- To install on macOS or Linux, check out the Installing Git chapter in the open-source Pro Git book. For macOS and Linux, we recommend configuring SSH authentication
Get your code
To get a copy of the source code, you clone the Git repo that contains the code. Cloning creates both a local copy of the source code so you can work with it. Cloning also creates all the version control information so Git can manage the source code.
If you're just getting started with Azure Repos, your code might be in one of several places:
- I just created my organization in Azure DevOps, so I don't have any code
- The code is in my (or my organization's) Azure Repos Git repo
- The code is in another Git repo such as GitHub or another Azure Repos Git repo
- The code is on my local computer and not yet in version control
I just created my organization in Azure DevOps, so I don't have any code
If you just signed up for Azure DevOps Services, by default you have a project named MyFirstProject and a Git repo named MyFirstProject. If you want to work in that repo, you can clone it and then add your code to that repo.
If you want to make a new repo, follow the steps in Create a new Git repo in your project. Then, clone the new repo and add your code there.
The code is in my (or my organization's) Azure Repos Git repo
If the code is in your (or your organization's) Azure Repo, you can clone the Git repo to your local computer and start working with it by jumping down to Clone the repo.
The code is in another Git repo
If the code is in another Git repo, such as a GitHub repo or a different Azure Repo instance, you can import it into a new or existing empty Git repo. Follow the steps in Import a Git repo. Then, return to this article and jump down to Clone the repo.
The code is on my local computer and not yet in version control
If your code is not yet in version control, you have a couple of options:
- Create a new repository and add your code there. To create a new repository and add your code there, follow the steps in Create a new Git repo in your project. Then, come back to this article and jump down to Clone the repo.
- Add your code to an existing repository. To do add your code to an existing repository, jump down to Clone the repo.
After the repository is cloned, we'll show you how to add your existing code to the repo.
Clone the repo to your computer
To work with a Git repo, you clone it to your computer. Cloning a repo creates a complete local copy of the repo for you to work with. Cloning also downloads all commits and branches in the repo and sets up a named relationship with the repo on the server. Use this relationship to interact with the existing repo, pushing and pulling changes to share code with your team.
-
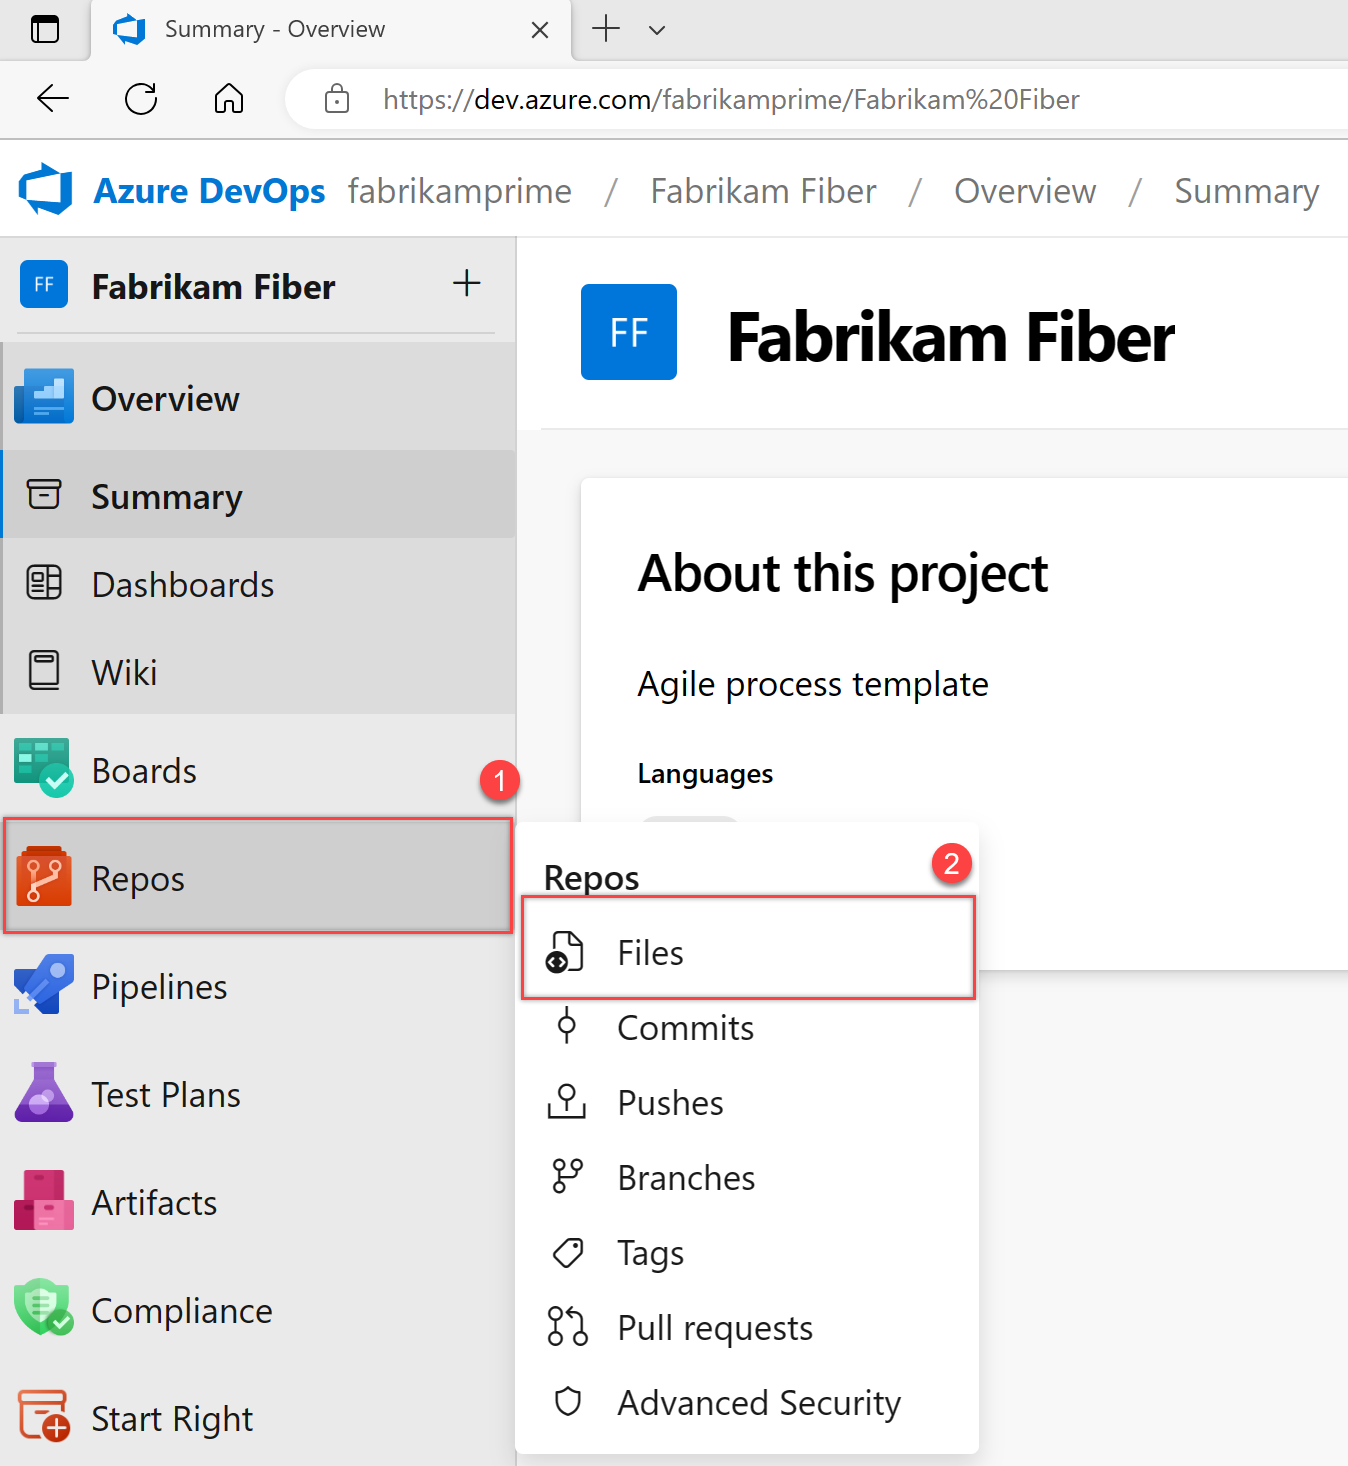
From your web browser, open the team project for your organization and select Repos > Files. If you don't have a team project, create one now.
-
Select Clone in the upper-right corner of the Code window and copy the URL.

-
Open the Git command window (Git Bash on Git for Windows). Go to the folder where you want the code from the repo stored on your computer, and run
git clone, followed by the path copied from Clone URL in the previous step. See the following example:git clone https://FabrikamFiber01@dev.azure.com/FabrikamFiber01/FabrikamFiber01-01/_git/FabrikamFiber01-01Git downloads a copy of the code, including all commits, and branches from the repo, into a new folder for you to work with.
-
Switch your directory to the repository that you cloned.
cd fabrikam-webKeep this command window open, as you'll use it in the following steps.
-
From your web browser, open the project for your organization, and select Code. If you don't have a project, create one now.
-
Select Clone in the upper-right corner of the Code window, and copy the URL.

-
Open the Git command window (Git Bash on Git for Windows). Go to the folder where you want the code from the repo stored on your computer, and run
git clone, followed by the path copied from Clone URL in the previous step. See the following example:git clone https://contoso-ltd.visualstudio.com/MyFirstProject/_git/contoso-demoGit downloads a copy of the code in a new folder for you to work with. The download includes all commits and branches from the repo.
-
Switch your directory to the repository that you cloned.
cd contoso-demoKeep the command window open (use it in the following steps).
Work in a branch
Git branches isolate your changes from other work being done in the project. The recommended Git workflow uses a new branch for every feature or fix that you work on.
Create branches by using the branch command. This command creates a reference in Git for the new branch. It also creates a pointer back to the parent commit so Git can keep a history of changes as you add commits to the branch.
Git always adds new commits to the current local branch. Check what branch you're working on before you commit so that you don't commit changes to the wrong branch.
Switch between local branches by using the checkout command. Git will change the files on your computer to match the latest commit on the checked-out branch.
In this step, we'll create a working branch and make a change to the files on your computer in that branch.
Use the branch command to create the branch and checkout to switch to that branch. In the following example, the new branch is named users/jamal/feature1.
git branch users/jamal/feature1 git checkout users/jamal/feature1 When you create a branch from the command line, the branch is based on the currently checked-out branch. When you clone the repository, the default branch (typically main) is checked out. Because you cloned, your local copy of main has the latest changes.
If you're working with a previously cloned repository, ensure that you've checked out the right branch (git checkout main) and that it's up to date (git pull origin main) before you create your new branch.
git checkout main git pull origin main git branch users/jamal/feature1 git checkout users/jamal/feature1 You can replace the first three commands in the previous example with the following command, which creates a new branch named users/jamal/feature1 based on the latest main branch.
git pull origin main:users/jamal/feature1 Switch back to the Git Bash window that you used in the previous section. Run the following commands to create and check out a new branch based on the main branch.
git pull origin main:users/jamal/feature1 git checkout feature1 Browse to the location of the repository on your local computer, make an edit to one of the files, and save it. If you're adding code from your local computer to the repository, you can add it here by copying it to the folder where you cloned the repository.
Work with the code
In the following steps, we make a change to the files on your computer, commit the changes locally, and push the commit to the repo stored on the server. We can then view the changes.
-
Browse to the folder on your computer where you cloned the repo, open the
README.mdfile in your editor of choice, and make some changes. Then save and close the file. -
In the Git command window, go to the
contoso-demodirectory by entering the following command:cd contoso-demo -
Commit your changes by entering the following commands in the Git command window:
git add . git commit -m "My first commit"The
git add .command stages any new or changed files, andgit commit -mcreates a commit with the specified commit message. -
Push your changes to the Git repo on the server. Enter the following command into the Git command window:
git push origin users/jamal/feature1
Your code is now shared to the remote repository, in a branch named users/jamal/feature1. To merge the code from your working branch into the main branch, use a pull request.
Review and merge your changes with a pull request
Pull requests combine the review and merge of your code into a single collaborative process. After you're done fixing a bug or new feature in a branch, create a new pull request. Add the members of the team to the pull request so they can review and vote on your changes. Use pull requests to review works in progress and get early feedback on changes. There's no commitment to merge the changes because you can abandon the pull request at any time.
This example shows the basic steps of creating and completing a pull request.
-
From your web browser, open the team project for your organization and select Repos > Files. If you kept your browser open after getting the clone URL, you can just switch back to it.
-
Select Create a pull request in the upper-right corner of the Files window. If you don't see a message like You updated users/jamal/feature1 just now, refresh your browser.

-
New pull requests are configured to merge your branch into the default branch, which in this example is
main. The title and description are pre-populated with your commit message.
You can add reviewers and link work items to your pull request.
You can review the files included in the pull request at the bottom of the New Pull Request window.

Select Create to create the pull request.
-
You can view the details of your pull request from the Overview tab. You can also view the changed files, updates, and commits in your pull request from the other tabs. Select Complete to begin the process of completing the pull request.

-
Select Complete merge to complete the pull request and merge your code into the
mainbranch.
Note
This example shows the basic steps of creating and completing a pull request. To learn more about pull requests, including voting and reviewing, commenting, autocomplete, and more, see Create, view, and manage pull requests.
-
From your web browser, open the team project for your organization and select the Code page. If you don't have a team project, create one now.
-
Select Clone in the upper-right corner of the Code page and copy the Clone URL.
-
Open the Git command window, for example Git Bash on Git for Windows, and browse to the folder where you want the code from the repo that is stored on your computer. Run
git clonefollowed by the path copied from the Clone URL in the previous section, as shown in the following example.git clone https://dev.azure.com/contoso-ltd/MyFirstProject/_git/contoso-demoGit downloads a copy of the code into a new folder for you to work with. The download includes all commits and branches from the repo.
-
Switch your directory to the repository that you cloned.
cd fabrikam-webKeep this command window open, because you'll use it in the following steps.
Your changes are now merged into the main branch, and your users/jamal/feature1 branch is deleted on the remote repository. To delete your local copy of the branch, switch back to your Git Bash command prompt and run the following commands.
git checkout main git pull origin main git branch -d users/jamal/feature1 The git checkout main command switches you to the main branch. The git pull origin main command pulls down the latest version of the code in the main branch, including your changes and the fact that users/jamal/feature1 was merged. The git branch -d users/jamal/feature1 command deletes your local copy of that branch.
Now you're ready to create a new branch, write some code, and do it again.
View history
-
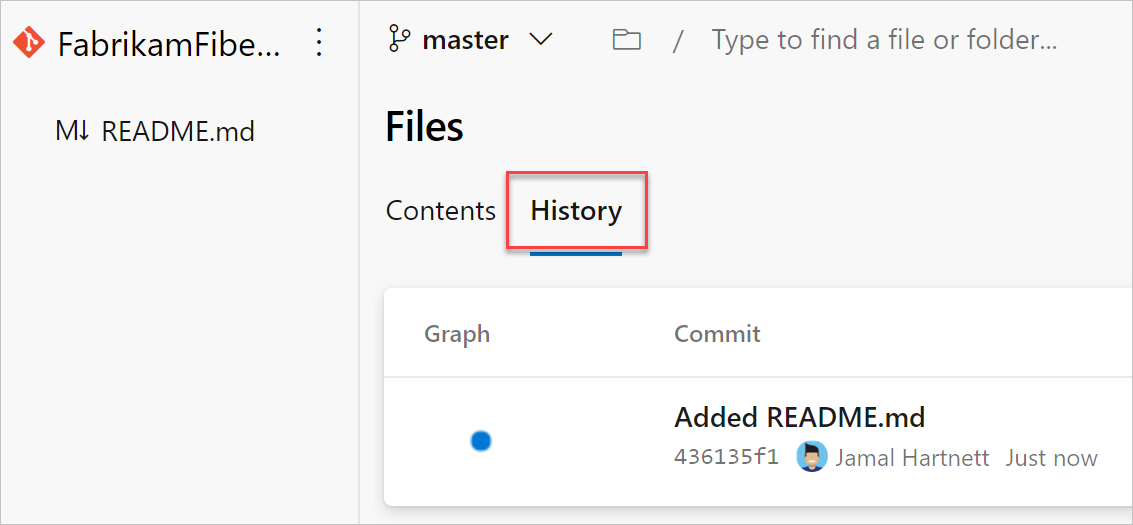
Switch back to the web portal, and select History from the Code page to view your new commit.
-
Switch to the Files tab, and select the README file to view your changes.

-
Switch back to the web portal, and select History from the Code tab to view your new commit. Two commits appear: the first commit, where the README and .gitignore were added upon repo creation, and the commit you just made.

-
Switch to the Files tab, and select the README file to view your changes.

Next steps
Feedback
Posted by: deko45.blogspot.com
Source: https://docs.microsoft.com/en-us/azure/devops/user-guide/code-with-git